Creating Animated Avatar for your Portfolio Website Using Ready Player, Mixamo, Next.js & React Three Fiber

In today’s competitive world, a portfolio website is more than just a collection of pretty pictures and code snippets. It’s your virtual business card, a creative playground, and a personal brand ambassador. Whether you’re a designer, developer, writer, or any other creative professional, having a well-crafted portfolio can open doors you never knew existed.
Why Does Your Portfolio Matter?
- First Impression is the Last Impression.
- Give a Platform to Showcase Your Skills.
- Allows you to Tell Your Story Creatively.
- Helps you Stand Out from the Crowd.
Creativity and Uniqueness:
Creativity and Uniqueness are the two ingredients that can transform an ordinary portfolio into something extraordinary:
- Creativity: Think beyond the conventional. Experiment with layouts, colors, and interactions. Surprise your visitors. Maybe add a playful animation or an unexpected hover effect. Creativity isn’t about following trends; it’s about setting them.
- Uniqueness: Your portfolio should scream “you.” Inject your personality into every pixel. Share your process, your inspirations, and your passion projects. Remember, there’s only one you, and that’s your superpower.
Ready to Create Your Animated Avatar for Your Portfolio Website?
Now we will explore how to breathe life into your portfolio using Ready Player, Mixamo, Next.js, and React Three Fiber.
without further ado, we will let's start our tutorial!
Step 1 — Initialize Project:
To create a new Next.js Project run the following command:
npx create-next-app@latestChoose the prompts accordingly:
What is your project named? next-with-animated-avatar
Would you like to use TypeScript? Yes
Would you like to use ESLint? Yes
Would you like to use Tailwind CSS? Yes
Would you like to use `src/` directory? Yes
Would you like to use App Router? (recommended) Yes
Would you like to customize the default import alias (@/*)? No
If you already have a Next project go to the next step.
Step 2 — Generate Avatar using Ready Player:
To create an avatar for yourself, you can visit https://readyplayer.me/. After logging in click Create New Avatar. Your screen may look different as I already have one avatar.

I have selected a random avatar and I will continue with the defaults. You can do the customizations as you like. Click “Next” after you have done all styling.

Now click the download button and it will download the .glb file.

Step 3 — Convert your .glb model file into .fbx using Blender:
Import your .glb model in Blender:

Now export your model as .fbx file:

This conversion from .glb to .fbx is important because to animate it we have to do it in Mixamo which does not support a .glb file.
Step 4 — Find Animation to Add to Your Model:
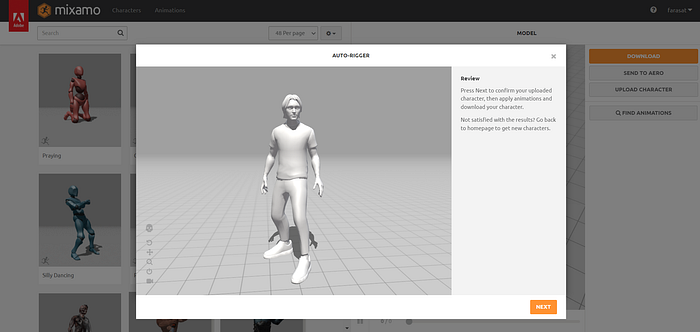
Go to https://www.mixamo.com/ and after signing in click “Upload Character”, when the popup appears, upload the .fbx file.
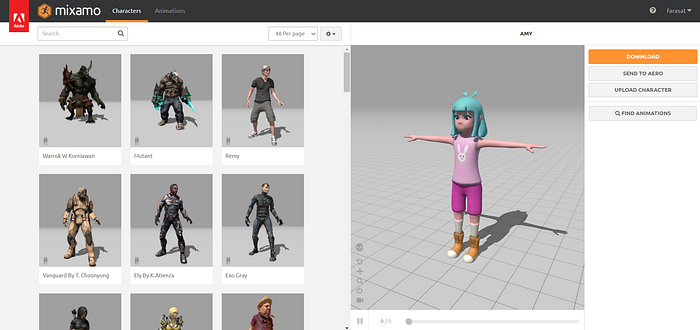
You will see a screen similar to this. Click next for all consecutive screens.
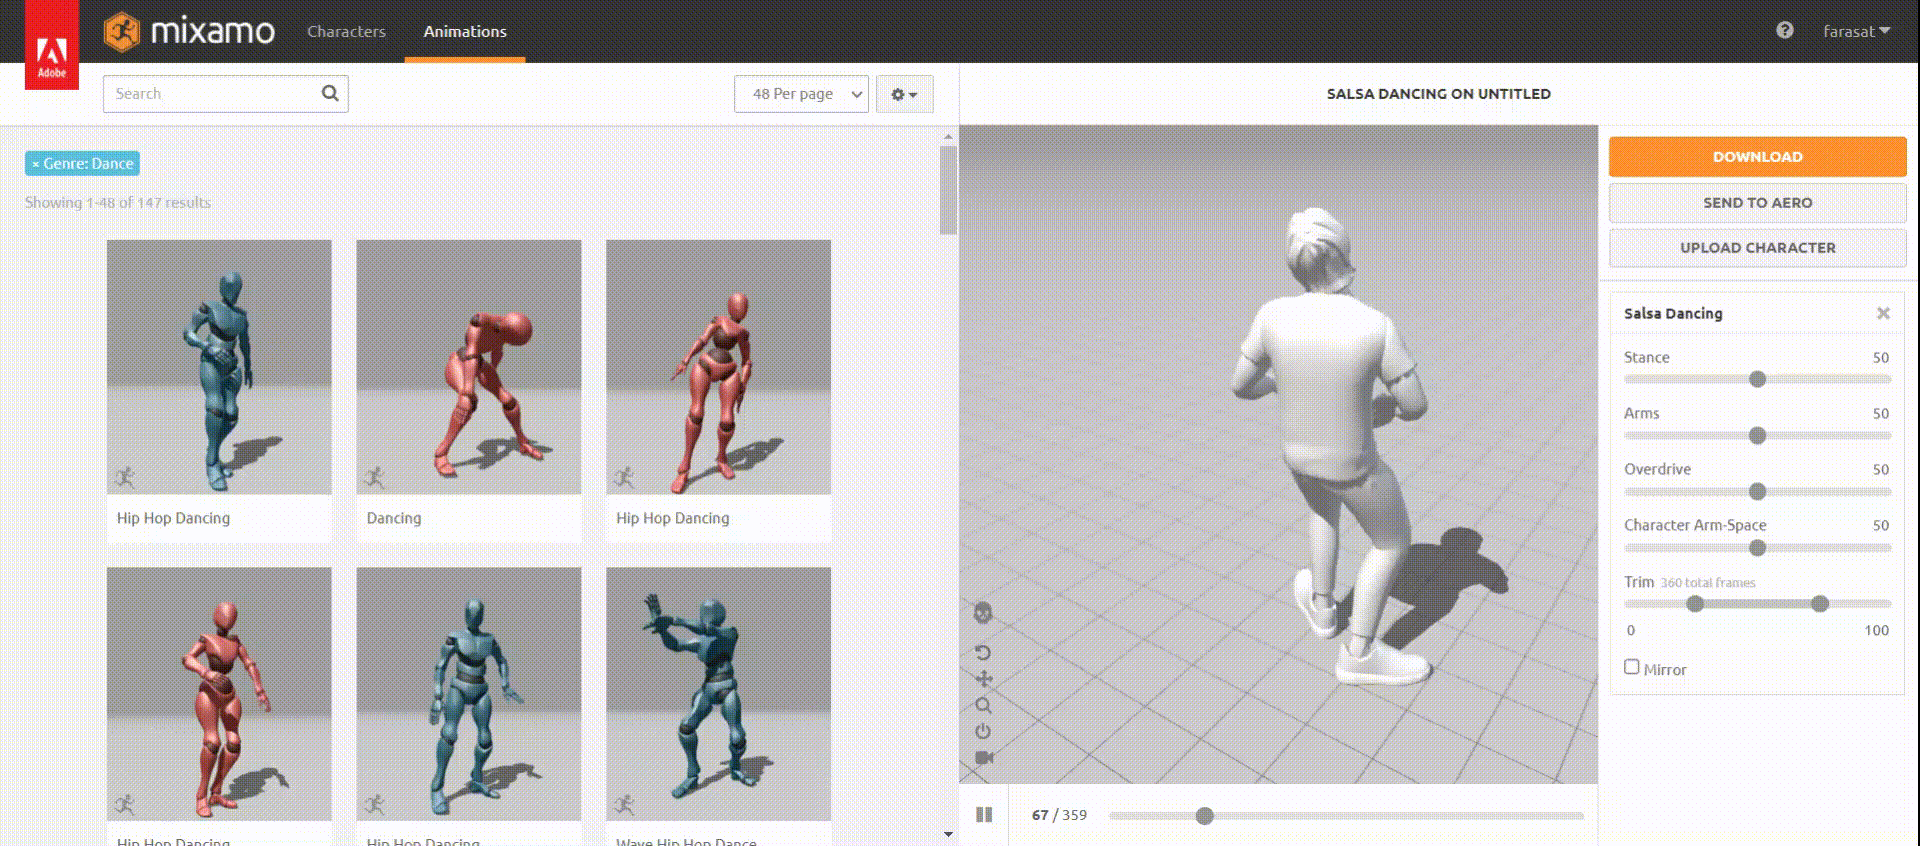
Now go to the animations tab and select your favorite animation.
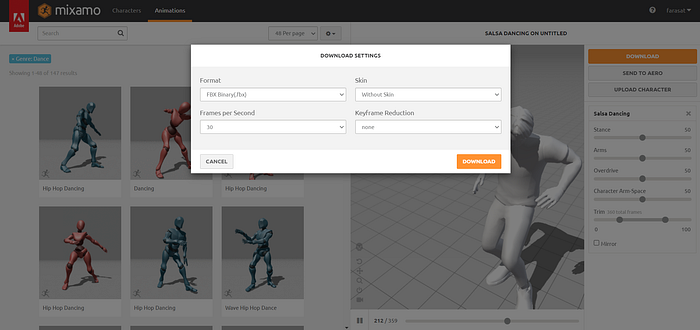
Now click on “Download” and select the “Without Skin” option and it will download only animation.
Step 5 — Configuring the Model in the Web App:
Now add your model and animation to the /public folder in your app. I have renamed the model avatar.glb and animation as avatar-animation.fbx. Add the required dependencies by running the following commands:
npm install three @react-three/fiber @react-three/drei
npm install --save-dev @types/three
Go to https://gltf.pmnd.rs/ to generate a jsx file for your model and you will get something like below. Paste the code in a file named Avatar.tsx on the root of your project.
/*
Auto-generated by: https://github.com/pmndrs/gltfjsx
*/

import React, { useRef } from "react";
import { useGLTF } from "@react-three/drei";

export function Model(props) {
  const { nodes, materials } = useGLTF("/65e0200654d1a2d49da6c487.glb");
  return (
    <group {...props} dispose={null}>
      <primitive object={nodes.Hips} />
      <skinnedMesh
        name="EyeLeft"
        geometry={nodes.EyeLeft.geometry}
        material={materials.Wolf3D_Eye}
        skeleton={nodes.EyeLeft.skeleton}
        morphTargetDictionary={nodes.EyeLeft.morphTargetDictionary}
        morphTargetInfluences={nodes.EyeLeft.morphTargetInfluences}
      />
      <skinnedMesh
        name="EyeRight"
        geometry={nodes.EyeRight.geometry}
        material={materials.Wolf3D_Eye}
        skeleton={nodes.EyeRight.skeleton}
        morphTargetDictionary={nodes.EyeRight.morphTargetDictionary}
        morphTargetInfluences={nodes.EyeRight.morphTargetInfluences}
      />
      <skinnedMesh
        name="Wolf3D_Head"
        geometry={nodes.Wolf3D_Head.geometry}
        material={materials.Wolf3D_Skin}
        skeleton={nodes.Wolf3D_Head.skeleton}
        morphTargetDictionary={nodes.Wolf3D_Head.morphTargetDictionary}
        morphTargetInfluences={nodes.Wolf3D_Head.morphTargetInfluences}
      />
      <skinnedMesh
        name="Wolf3D_Teeth"
        geometry={nodes.Wolf3D_Teeth.geometry}
        material={materials.Wolf3D_Teeth}
        skeleton={nodes.Wolf3D_Teeth.skeleton}
        morphTargetDictionary={nodes.Wolf3D_Teeth.morphTargetDictionary}
        morphTargetInfluences={nodes.Wolf3D_Teeth.morphTargetInfluences}
      />
      <skinnedMesh
        geometry={nodes.Wolf3D_Hair.geometry}
        material={materials.Wolf3D_Hair}
        skeleton={nodes.Wolf3D_Hair.skeleton}
      />
      <skinnedMesh
        geometry={nodes.Wolf3D_Body.geometry}
        material={materials.Wolf3D_Body}
        skeleton={nodes.Wolf3D_Body.skeleton}
      />
      <skinnedMesh
        geometry={nodes.Wolf3D_Outfit_Bottom.geometry}
        material={materials.Wolf3D_Outfit_Bottom}
        skeleton={nodes.Wolf3D_Outfit_Bottom.skeleton}
      />
      <skinnedMesh
        geometry={nodes.Wolf3D_Outfit_Footwear.geometry}
        material={materials.Wolf3D_Outfit_Footwear}
        skeleton={nodes.Wolf3D_Outfit_Footwear.skeleton}
      />
      <skinnedMesh
        geometry={nodes.Wolf3D_Outfit_Top.geometry}
        material={materials.Wolf3D_Outfit_Top}
        skeleton={nodes.Wolf3D_Outfit_Top.skeleton}
      />
    </group>
  );
}

useGLTF.preload("/65e0200654d1a2d49da6c487.glb");
Now we will edit this file as follows to configure our model:
// Avatar.tsx

"use client";

import React, { FC, useEffect, useRef } from "react";
import { useAnimations, useFBX, useGLTF } from "@react-three/drei";
import { GroupProps } from "@react-three/fiber";

const Avatar: FC<GroupProps> = (props) => {
  const { nodes, materials } = useGLTF("/avatar.glb");

  // adding ref for group to add animation
  const groupRef = useRef();

  // loading you animation
  const { animations: avatarAnimation } = useFBX("/avatar-animation.fbx");
  // updating you animation name (optional)
  avatarAnimation[0].name = "avatar-animation";

  // creating actions based on the animation
  const { actions } = useAnimations(avatarAnimation, groupRef);

  // playing the animation
  useEffect(() => {
    if (actions?.["avatar-animation"])
      actions["avatar-animation"].reset().play();
  }, [actions]);

  return (
    <group {...props} ref={groupRef as any} dispose={null}>
      <group>
        <primitive object={nodes.Hips} />
        <skinnedMesh
          name="EyeLeft"
          geometry={(nodes.EyeLeft as any).geometry}
          material={materials.Wolf3D_Eye}
          skeleton={(nodes.EyeLeft as any).skeleton}
          morphTargetDictionary={(nodes.EyeLeft as any).morphTargetDictionary}
          morphTargetInfluences={(nodes.EyeLeft as any).morphTargetInfluences}
        />
        <skinnedMesh
          name="EyeRight"
          geometry={(nodes.EyeRight as any).geometry}
          material={materials.Wolf3D_Eye}
          skeleton={(nodes.EyeRight as any).skeleton}
          morphTargetDictionary={(nodes.EyeRight as any).morphTargetDictionary}
          morphTargetInfluences={(nodes.EyeRight as any).morphTargetInfluences}
        />
        <skinnedMesh
          name="Wolf3D_Head"
          geometry={(nodes.Wolf3D_Head as any).geometry}
          material={materials.Wolf3D_Skin}
          skeleton={(nodes.Wolf3D_Head as any).skeleton}
          morphTargetDictionary={
            (nodes.Wolf3D_Head as any).morphTargetDictionary
          }
          morphTargetInfluences={
            (nodes.Wolf3D_Head as any).morphTargetInfluences
          }
        />
        <skinnedMesh
          name="Wolf3D_Teeth"
          geometry={(nodes.Wolf3D_Teeth as any).geometry}
          material={materials.Wolf3D_Teeth}
          skeleton={(nodes.Wolf3D_Teeth as any).skeleton}
          morphTargetDictionary={
            (nodes.Wolf3D_Teeth as any).morphTargetDictionary
          }
          morphTargetInfluences={
            (nodes.Wolf3D_Teeth as any).morphTargetInfluences
          }
        />
        <skinnedMesh
          geometry={(nodes.Wolf3D_Hair as any).geometry}
          material={materials.Wolf3D_Hair}
          skeleton={(nodes.Wolf3D_Hair as any).skeleton}
        />
        <skinnedMesh
          geometry={(nodes.Wolf3D_Body as any).geometry}
          material={materials.Wolf3D_Body}
          skeleton={(nodes.Wolf3D_Body as any).skeleton}
        />
        <skinnedMesh
          geometry={(nodes.Wolf3D_Outfit_Bottom as any).geometry}
          material={materials.Wolf3D_Outfit_Bottom}
          skeleton={(nodes.Wolf3D_Outfit_Bottom as any).skeleton}
        />
        <skinnedMesh
          geometry={(nodes.Wolf3D_Outfit_Footwear as any).geometry}
          material={materials.Wolf3D_Outfit_Footwear}
          skeleton={(nodes.Wolf3D_Outfit_Footwear as any).skeleton}
        />
        <skinnedMesh
          geometry={(nodes.Wolf3D_Outfit_Top as any).geometry}
          material={materials.Wolf3D_Outfit_Top}
          skeleton={(nodes.Wolf3D_Outfit_Top as any).skeleton}
        />
      </group>
    </group>
  );
};

useGLTF.preload("/avatar.glb");

export default Avatar;
Add another file avatar-renderer.tsx in /components folder, we create Canvas there and render the model.
// components/avatar-renderer.tsx

"use client";

import { Suspense } from "react";

import { Canvas } from "@react-three/fiber";
import { Environment, OrbitControls } from "@react-three/drei";

import Avatar from "@/Avatar";

const ModelRenderer = () => {
  return (
    <div className="w-full h-auto aspect-[24/25]">
      <Suspense
        fallback={
          <div className="w-full flex items-center justify-center h-[calc(100vh-300px)] font-bold text-[30px] font-mono text-white">
            loading...
          </div>
        }
      >
        <Canvas
          shadows="basic"
          // adjust camera parameters according to your needs
          camera={{
            position: [0, -5, 1.5],
            fov: 50,
            castShadow: true,
            zoom: 1.3,
          }}
          className="w-full h-full"
        >
          <OrbitControls />
          <ambientLight intensity={1.5} />
          <Environment preset="sunset" />
          <directionalLight intensity={0.8} />
          <Avatar />
        </Canvas>
      </Suspense>
    </div>
  );
};

export default ModelRenderer;
At last, we can add this to our main layout. Go to page.tsx and add the following code:
// app/page.tsx
import ModelRenderer from "@/components/model-renderer";
export default function Home() {
return (
<div className="flex items-center justify-center flex-col bg-gray-300">
<div className="relative w-[90%] max-w-[1000px] h-auto mt-20">
<ModelRenderer />
</div>
</div>
);
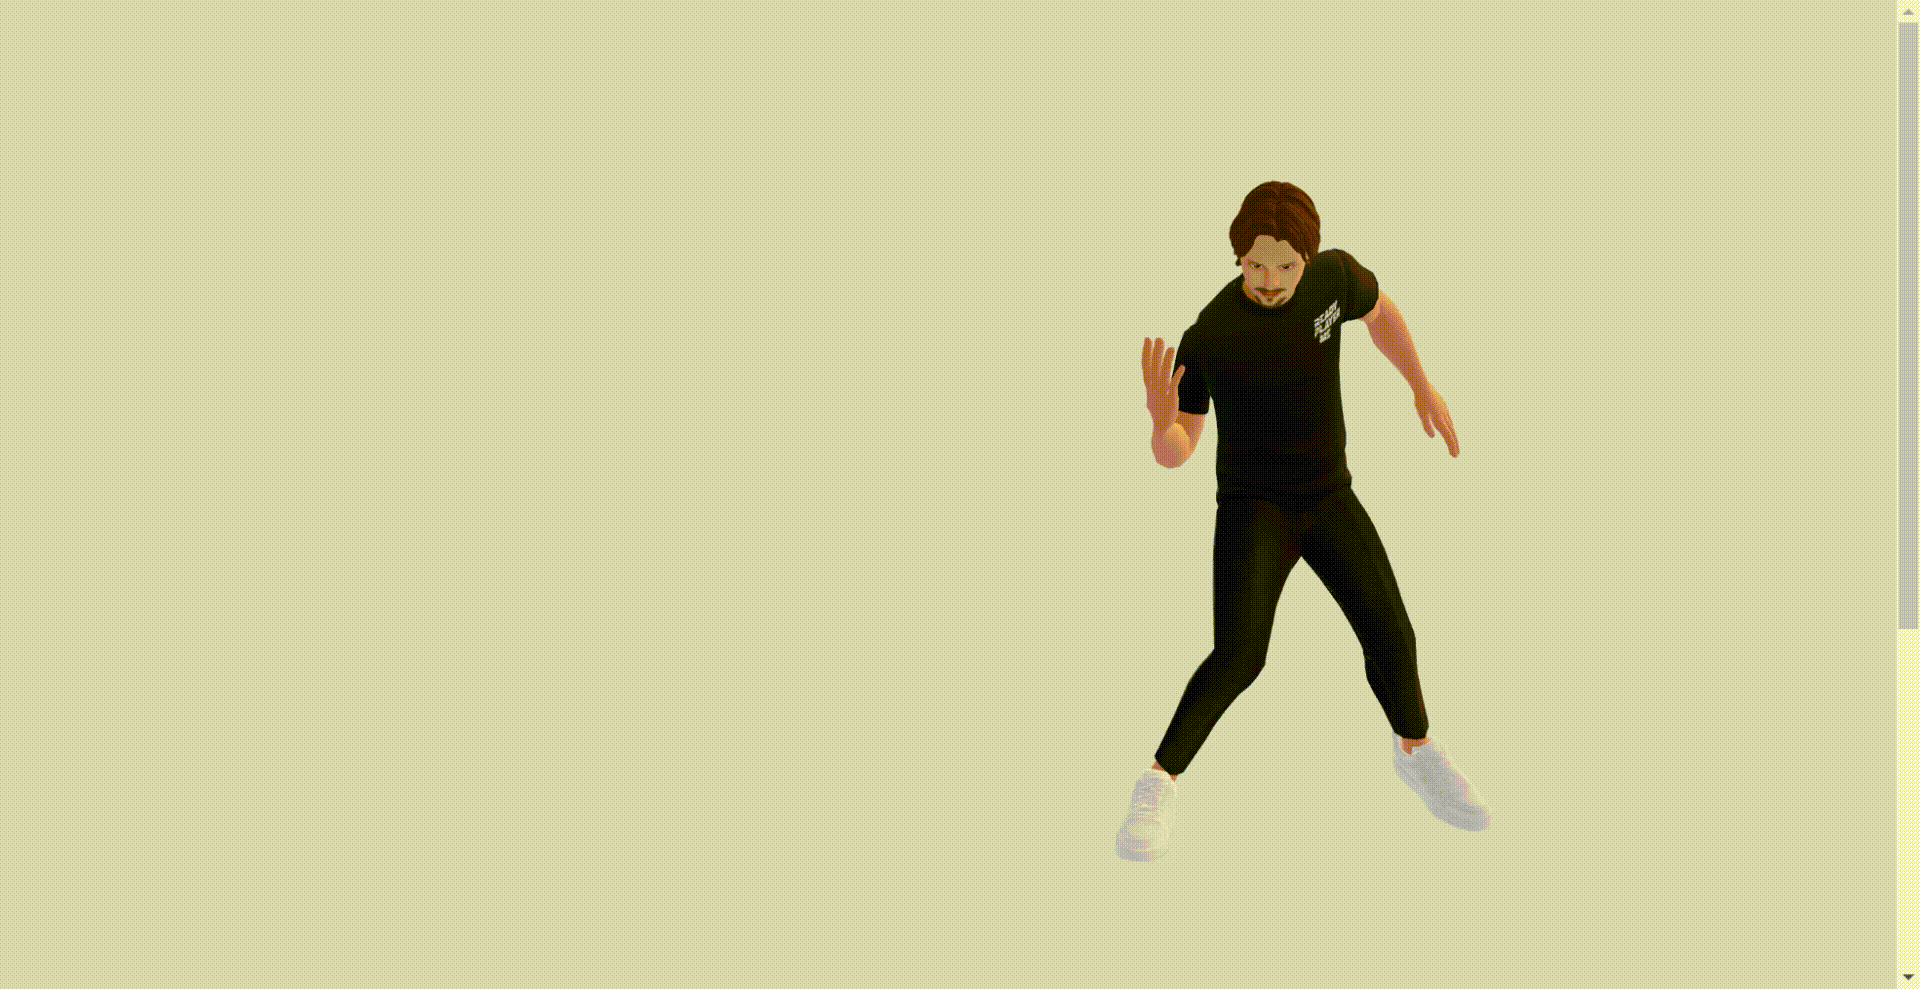
}You will see results something like:
And that’s it, Happy Coding! 😊
Access the Code at:
Visit the Live version at: https://next-with-animated-avatar.vercel.app/
If you liked my story you can follow me for more interesting tips and tricks at Farasat Ali — Medium.
You can Find Me on LinkedIn and GitHub.
Also, Visit My Portfolio at:
You can also explore the following related articles:
Stackademic 🎓
Thank you for reading until the end. Before you go:
- Please consider clapping and following the writer! 👏
- Follow us X | LinkedIn | YouTube | Discord
- Visit our other platforms: In Plain English | CoFeed | Venture | Cubed
- More content at Stackademic.com